{This post may contain affiliate links. That means that I earn a commission if you make a qualifyingpurchase through my links (such as Amazon), but it does not change the price that you pay. For more information, please see my disclaimer page.}
{This post contains affiliate links. For more information you can click here.}

I love lighting a candle at home. There is just something about a lit candle that sets a lovely tone in the house.
I had quite the collection of candles.
Unfortunately, the majority of candles produced commercially are made from lead wicks, synthetic scents and waxes (paraffin and soy) that put toxins (and carcinogens) into the air.
Beeswax on the other hand clears the air, emitting negative ions purifying the air.
Beeswax is not as cheap as other waxes, but it burns longer and brighter, cleaning the air instead of adding toxins. (For more information on how this works and some added benefits, you can read this article)
They are also a snap to make! I have read that making them at home is not always as cost effective, since homemade versions might not burn as long, but I think it is worth it.
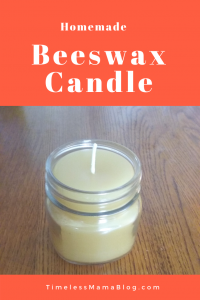
How to Make a Beeswax Candle
You will need:
- A Heat-Safe Glass Jar (canning jars work well)
- Beeswax (You can also source it locally, try for organic though)
- Metal Free Wick*
- A Small Pot or Double Boiler
Start your wax melting gently over med-low heat (if you are using a double boiler you could use medium heat).
Set your wick in the center of your container using a couple of drops of melted wax. It is important that you center the wick as best as you can. If it slips while pouring, try to get it back in the center.
Pour wax into jar and allow to cool (you do not want to speed the process by sticking it in the frig because cooling too fast can cause wax to crack, it will not affect the burn of the candle, but some people do not like the way it looks).
There are some recipes out there that call for mixing the beeswax with coconut oil or other oils to help them burn more evenly (beeswax has a rather high melting point, so it can cause ‘tunneling’ around the wick, adding oils lowers the melting point). Since you should not heat these oils to the smoke point because they can produce toxins, I am a little wary of using them in a candle.
There is debate as to using essential oils to scent candles as well, for much the same reason. I use essential oils in a diffuser to scent our home, so I really did not feel the need to put it in the candles.
Tunneling does not bother me much, since I melt down the wax left after the wick has burned down to make a new candle.
Some things to know about burning beeswax candles:
The first time you burn your candle sets the stage for the rest of the candle’s life.
It is recommended that you not trim the wick for the first burn, and that you burn it for an hour per inch in diameter of the container (3 inches=3 hours), you really want the entire ¼ inch of wax on the top melted, so, given variances in wick and wax, you may need to go a bit longer.
After the first burn, you do want to trim the wick to ¼ inch before burning.
When you burn the after the first burn, you will want to burn it for a good stretch to prevent tunneling, but as I mentioned before, the leftover wax can be remelted to make a new candle.
For General Candle Burning Safety, you can visit the National Candle Association’s Candle Safety Page.
*Mommypotomus has a nice tutorial with a great guide to choosing the right wick size.


Love the candle making idea! And thank iu for the link ups!
I love lighting candles! I am starting to learn more about commercial candles and am seriously thinking about switching to beeswax ones – they don’t sound too tricky to make! How fun! 🙂
I’ve always wanted to make candles maybe I will give it a try
Ooh, cool! Thanks for posting this.
I messed up quite a few candles until I learned to “set” them. I love candles and have them all over the house. I have to be careful of the scents though. I’ve never tried making my own and it looks like fun. And something I could do with my granddaughter.